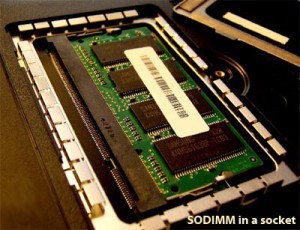
The RAM memory in most notebook computers is user-upgradeable. Almost all notebook machines use SODIMMs (Small Outline Dual Inline Memory Modules).
Part of the trick is to discover where the memory modules are located in a notebook machine. The best advice is to get online and look up the owners manual or technical manual for your model at the manufacturer’s support website. Or you can search for “{Make} {Model number} takeapart” on Google to find diagrams or YouTube videos of how to take apart your machine.
Also refer to online references or contact Canadaram.com to determine how much memory your machine can take, and what specification it needs.
The advice following is generic information, your machine may be different. Before starting the installation, shut the machine all the way down, and once it is completely shut down, take out the battery. Now you are ready to open it.
 On many machines, the memory is behind a door on the bottom of the machine, often the door is marked with the rectangular symbol of a memory chip. Typically there are one to four tiny Philips #00 screws to remove (don’t lose them), then the door un-clips. Usually the memory sockets are visible, but on some machines there can be a shield or a cover over them which has to be removed.
On some machines, only one SODIMM socket is located under the machine, the other SODIMM socket (or sometimes both) may be under the keyboard. Look for small tabs between the function keys at the top which you can slide back to allow the keyboard to lift up. Be very careful of the ribbon cable that attaches the keyboard, they are easy to tear or pull out.
Below are general instructions for installation of SODIMMs:
The key to SODIMM installation is to seat the RAM module’s pins fully into the socket contacts.
- First of all, observe the slot in the connector edge of the module, it needs to line up with the key across the socket’s contacts.
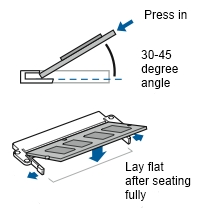
- You insert the module’s connector edge into the socket contacts with the module held up at about a 45 degree angle
 While the module is still up on the angle, use both thumbs on the long edge of the module to firmly push the module’s connector edge into the socket contacts.
- Only then, lay the module down to the flat position. The module retaining clips will click as you lay it down (but the clips clicking is not an indication that the RAM is properly seated).
- Look at the module, you should see very little (1mm) or none of the gold contacts remaining visible. The edge of the contacts should line up parallel with the socket. If it is angled in the socket or there is more than 1mm of contacts visible, remove the module and reinstall it.
Remember that machines with a 32-bit operating system and older machines that are not 64-bit clean will use at most 3.0 – 3.5 GB of RAM even if 4 GB is installed. You require all three of
- a 64-bit OS,
- a 64-bit CPU and a
- 64-bit compatible chipset (BIOS and memory controller)
to use more than 4 GB of RAM.
Occasionally, older machines will require a BIOS update to recognize the larger RAM modules, check the manufacturer’s support site for Drivers and Downloads for your model. Back up your data before starting a BIOS flash update, and follow the instructions to the letter.
Acer technical support pages Purchase RAM modules
Asus support pages Purchase RAM modules
Dell support pages Purchase RAM modules
Gateway support pages Purchase RAM modules
Hewlett-Packard and Compaq support pages Purchase RAM modules
Lenovo support pages Purchase RAM modules
Sony Vaio support pages Purchase RAM modules
Toshiba support pages Purchase RAM modules
